Advertisement Header

Monday 31 July 2017

How to Setup Billing Alarm in AWS

AWS Free Tier Account:


As we know Amazon provided great opportunity by providing Free Tier account for Tecno enthusiast / Freshers or in reality for any one who are trying to start their careers in to cloud world.

Free tier account really helps us to get our hands dirty, Below are the few services/resources which are highly useful while you are practicing

1) EC2       - 750 hours in a billing cycle (Monthly)
2) S3          - 5 GB
3) Lambda - 1 milling free requests
4) RDS       - 750 hours per month of db.t2.micro database usage (applicable DB engines)

Any many more, here you can find more details about Free tier https://aws.amazon.com/free

Why to setup Billing Alert?

Since many of us to try different services in different AWS regions, sometimes we may forgot to shutdown or delete resources which will leads to hit your limit on free tier, So once you hit your limit from there on Amazon will start billing for those resources we may realize that only when we get a bill. So these billing alerts will helps us to notify when the resource consumption is exceeding certain threshold which we set.

Setup Billing Allert:

Step 1: Once you login into AWS console, you can navigate your "My Account"or " "My Billing Dashboard" as below:


 Step 2: Navigate to "Preferences" Tab from the left column


             Enable "Receive Billing Alerts" option and then "Save preferences"


Step 3: You can choose "Manage Billing Alerts" option as below which will open new tab which leads to cloud watch service


Step 4: Under Billing --> You can create New Alarm 


Now you can define you alarm with the threshold you want to set like 10$ / 15 $ any value as              your wish to sped / Month and give your valid email address where you want to receive alert


Step 5: Once Create Alarm, You will get a notification to the given email ID as below:


            You can confirm your subscription by clicking on the link

Now you can Alarm configured and from now cloud watch is going your consumption in terms of billing and send you alert when you exceed the billing threshold.


From now you need to pay more money then what you set threshold.

Hopefully you enjoyed this post, Here is the relevant hands on video 


Wednesday 7 June 2017

How to Mount S3 Bucket on Linux (AWS EC2 Instance) Use Case:

Use Case:

AWS S3 is awesome resource for cloud object storage and the consumption of S3 is varies from customer, very common use cases were:
  • Backup and Storage – Provide data backup and storage services for others.
  • Application Hosting – Provide services that deploy, install, and manage web applications.
  • Media Hosting – Build a redundant, scalable, and highly available infrastructure that hosts video, photo, or music uploads and downloads.
  • Software Delivery – Host your software applications that customers can download. 
Here I will explain how we implemented S3 in one of our customer.

Customer Requirement:

Customer have an application index logs in AWS EC2 application cluster which have 4 instance as part of the cluster, from each application server logs need to stored centrally and need to accessible (Read-Only) frequently from all server.

We can consider NFS sort of solution, even now we have EFS from Amazon but it costly and even the same data were using for their analytics solution. So we thought to use S3 to satisfy both the requirement.

Solution:

We have mount S3 on all required Linux EC2 instance using S3fs, so that all required instances have access to logs at the same time their analytic solution also can read data using s3api.

Filesystem in Userspace (FUSE) is a simple interface for userspace programs to export a virtual file-system to the Linux kernel. It also aims to provide a secure method for non privileged users to create and mount their own file-system implementations.
S3fs-fuse project is written in python backed by Amazons Simple Storage Service. Amazon offers an open API to build applications on top of this service, which several companies have done, using a variety of interfaces (web, rsync, fuse, etc).

Below are the pre-requisites to install and setup S3fs:

  • EC2 instance with root access or sudo access to install S3fs and mount volume
  • IAM user which have S3 Full access (For Upload/Download)
  • Download latest S3fs package from http://code.google.com/p/s3fs/downloads/list 
  • update your system to latest using
         yum update all (for CentOS)
         apt-get update (for Ubuntu)
  • Install below dependencies before installing S3fs package
For CentOS 
yum install gcc libstdc++-devel gcc-c++ fuse fuse-devel curl-devel libxml2-devel openssl-devel mailcap 
For Ubuntu
apt-get install build-essential gcc libfuse-dev libcurl4-openssl-dev libxml2-dev mime-support pkg-config libxml++2.6-dev libssl-dev

Follow the below steps to mount your S3 bucket to your Linux Instance:

 Step 1: Download latest s3fs package and extract:

wget https://storage.googleapis.com/google-code-archive-downloads/v2/code.google.com/s3fs/s3fs-1.74.tar.gz


tar -xvzf s3fs-1.74.tar.gz

Step 2: Update OS and install dependencies as mentioned in above pre-req.

Step 3:  Now change to extracted directory, compile and install s3fs source code.

cd s3fs-1.74

./configure --prefix=/usr

make

make install

Step 4: Use below command to check where s3fs command is placed in O.S. It will also confirm whether installation is ok:

which s3fs

Step 5: Get IAM user Access and secret key which have appropriate permissions (e.g. S3 Full access), You can get the same from AWS IAM console

Step 6: Create a new file in /etc with the name passwd-s3fs and Paste the access key and secret key in the below format and change the permission for the file:


echo "AccessKey:SecretKey" > /etc/passwd-s3fs


chmod 640 /etc/passwd-s3fs

Note: Replace AcessKey and SecretKey with original keys.

Step 7: Now create a directory and mount S3bucket in it. Here, Provide your S3 bucket name in place of “your_bucketname”


mkdir /sravancloudarch

s3fs your_bucketname -o use_cache=/tmp -o allow_other -o multireq_max=5 /mys3bucket

Replace your_bucket = S3 bucket name which you want to mount
Replace /sravancloudarchS3 = Directory name which you want to mount


/usr/bin/s3fs sravancloudarch -o use_cache=/tmp -o allow_other -o multireq_max=5 /sravancloudarch


You can validate whether it is mounted using below command:

[root@ip-172-31-49-68 ~]# df -h
Filesystem      Size  Used Avail Use% Mounted on
devtmpfs        488M   56K  488M   1% /dev
tmpfs           497M     0  497M   0% /dev/shm
/dev/xvda1      7.8G  1.1G  6.6G  15% /
s3fs            256T     0  256T   0% /mys3bucket
s3fs            256T     0  256T   0% /sravancloudarch
[root@ip-172-31-49-68 ~]# 

Note: At any given point you can unmount this volume using below command:


umount /sravancloudarch


Now this volume is Non-Persistent i.e; once you reboot your system this mount point wont exists, to make it persistent and automatically mount for every reboot we need to add below entries to /etc/rc.local

nano /etc/rc.local

Add below Line and save the file:


/usr/bin/s3fs sravancloudarch -o use_cache=/tmp -o allow_other -o multireq_max=5 /sravancloudarch


Now you should be able to read and write filed to S3 (Considering you have S3 full access).

touch /sravancloudarchS3/sravan

[root@ip-172-31-49-68 ~]# ls -lrt /sravancloudarch/
total 1
-rw-r--r-- 1 root root 0 Jun  7 10:11 sravan
[root@ip-172-31-49-68 ~]# 


Now you have successfully mounted your S3 bucket as a Volume in your EC2 instance, any files which you write in /sravancloudarch directory will be replicated to your Amazon S3 bucket.

Hopefully you enjoyed this post, Here is the relevant hands on video 


Tuesday 21 March 2017

HandsON! Review: AWS EC2Rescue for Windows instances

When it comes to troubleshooting Windows server issues, it is not easy to get all required logs at same time with single tool. Systems Administrators will spend their valuable time on collecting logs when troubleshooting below issues:

  • Boot Issues
  • Restore
  • Disk issues
  • Generate OS logs
  • Generate Memory dumps
  • Export Registry entries
  • Windows Update Logs
  • Export Event Logs

We will spend time on lot of multiple tools/utilities to generate or export above logs/dumps when it comes to cloud environment expectation to resolve the issues is much higher at the same time we need to equip with right tools to achieve the same supporting the cause Amazon had recently released EC2Rescue GUI based troubleshooting tool to help us to resolve operations system issues to generate logs faster.


The following are a few common issues that are addressed by EC2Rescue:

  • Instance connectivity issues due to:
    • Firewall configuration
    • RDP service configuration
    • Network interface configuration
  • Operating system (OS) boot issues due to:
    • Blue screen or stop error
    • Boot loop
    • Corrupted registry
  • Any issues that might require advanced log analysis and troubleshooting

Here are the System Requirements to install EC2Rescue which can be downloaded

  • Windows Server 2008 R2 or later
  • NET Framework 3.5 SP1 or later installed
  • Is accessible from a Remote Desktop Protocol (RDP) connection
Note: EC2Rescue can only be run on Windows Server 2008 R2 or later, but it can also analyze the offline volumes of Windows Server 2008 or later.

How to USE:

Note: Here are the few things where this tool cannot help:
  • Windows Update logs are not captured on Windows Server 2016 instances.
  • Offline instance refers to a stopped instance whose root volume has been detached and then attached to another instance as a secondary volume for troubleshooting with EC2Rescue.
  • Run this tool with the account which have local administrator access.

Step 1: One we downloaded tool from here 


Step 2: Unzip the download zip file


Step 3: Double click on EC2Rescue.exe to open and click on next to begin.


Step 4: Now we can select mode Current Instance / Offline instance

Current Instance Mode
This mode analyzes the instance on which EC2Rescue is currently running. It is read-only and does not modify the current instance, and therefore it does not directly fix any issues. Use this mode to gather system information and logs for analysis or for submission to system administrators or AWS Support.


When we select Current instance mode, we will get option to capture logs:


Here EC2Rescue tool will give us more options to select which ever logs we need to generate based on kind of issue we can select type of logs we need.


Once we select required logs click on Collect and it will prompt information dialog box (Note: Read it very carefully when you are sharing logs with any third party vendors).


Once you accept by clicking yes it will be prompted to select the filename and file location to store. Give appropriate filename and location as required.


It will generate above selected logs and place @ your mentioned location, once you extract selected logs will be available as below:

We can share this logs with third party as required or we can use ourself to troubleshoot.

Now lets see what we can perform using Offline Instance Mode:

Offline Instance Mode
This mode allows you to select the volume of the offline system. EC2Rescue analyzes the volume and presents a number of automated rescue and restore options. Also included is the same log collection feature as the Current Instance Mode.

Note: Offline instance refers to a stopped instance whose root volume has been detached and then attached to another instance as a secondary volume for troubleshooting with EC2Rescue.

Once we attach the volume which we need to troubleshoot to the instance where we can run Ec2Rescue Tool. we can select offline instance as above.

Now we should be able to see newly attached volume in Computer Management panel:


Make it disk Online by right clicking (In my case it is Disk 1 your disk number may change based on number of existing disks you may have)


Open Ec2Rescue tool by double clicking on Ec2Rescue.exe as mentioned above.

This time we have to select Offline Instance


Now we will get the additional Volume which is Disk 1 in my case will be visible to select.


It will be prompter the warning whether we selected appropriate volume and we can agree the same by clicking yes


Volume Successfully loaded


Now we will have Offline instance troubleshooting options a follows:
  • Diagnose and Rescue
  • Restore
  • Capture Logs


Lets Explore "Diagnose and Rescue"


Now it will display summary of possible issues:


We can select Next to proceed to issue selection


Select appropriate option as required to fix the issue. In my case I tried to set Ec2 Password to Rescue.


Lets Explore "Restore"


We will have below restore options:

Select appropriate restore option in my case restore registry and then click on restore.

Lets Explore "Capture Logs" this as like as which we perform for Current instance option.


Select appropriate logs to collect


Once we are done with troubleshooting for additional volume which we attached can be detached and add back to original instance to boot as usual.


Final Verdict 

As we can see Ec2Rescue tool will be very handy for troubleshooting windows instance (Online/offline) related issues, So I would definitely encourage others to use and make benefit out of it.

Hope this review post help you.

Tuesday 14 March 2017

How to migrate VM to AWS (Cold Migration)


Now a days there is a lot of demand for AWS and of course it is easy to adopt AWS services like EC2, S3, etc., but not all the time we may able to deploy new instances and install applications, there may be some scenarios where we may need to migrate complete VM from physical datacenter to AWS. So here we will discuss about how we can do cold migration of VM to AWS.

VM Import/Export enables us to import virtual machine (VM) images from our existing virtualization environment to Amazon EC2, and then deploy new instance using same AMI, this will enable us to copy our VM image catalog to Amazon EC2, or create a repository of VM images for backup and disaster recovery.

Below Software’s /applications will be used to complete this cold migration:
  • VMware Workstation
  • Ovftool 

Step 1: Setup a VM

Install a windows 2012 r2 server using VMWare Workstation using the windows 2012 r2 ISO. 

Step 2: Exporting the VM

We need to export this VM as OVA file or VMDK, VHD OR RAW. So, power off the VM and
Go to -> File -> Export to OVF. 
Now the VM is exported in the format of OVF.


https://aws.amazon.com/ec2/vm-import/ gives us the detailed information. 

Step 3: Conversion of OVF to OVA

The OVF file should be converted to OVA file to import the VM in AWS. VMware player helps to convert OVF to OVA, 

VMware OVFtool can be downloaded ovftool-download

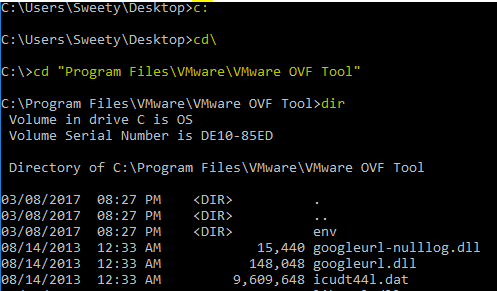
After installation of ovftool, run the below commands

cd "Program Files\VMware\VMware OVF Tool"
ovftool.exe H:\Image\Windows-2012-Server.ovf H:\Image\Windows-2012-Server.ova (This command converts from .ovf to .ova)


Now the VM is successfully converted from OVF to OVA.


Step 4: Exporting OVA to S3 

For exporting this OVA to S3, we need to have a user and an IAM role in AWS. 
And also install AWS CLI for 64bit. 

After installing AWS CLI, run the commands using command prompt.

aws configure (Give the access key , secret key and region)
aws s3 ls
aws s3 cp Windows-2012-Server.ova s3://migratebucket/ (Cpoying the ova file to s3 bucket)


aws s3 ls s3://migratebucket/ (To view the uploaded ova in s3)

Step 5: Importing OVA

To import OVA as an image, there are few steps that needed to be followed.

1.       Open a notepad and type the below commands and save it as trust-policy.json
{
   "Version": "2012-10-17",
   "Statement": [
      {
         "Effect": "Allow",
         "Principal": { "Service": "vmie.amazonaws.com" },
         "Action": "sts:AssumeRole",
         "Condition": {
            "StringEquals":{
               "sts:Externalid": "vmimport"
            }
         }
      }
   ]
}

As an aws user, run the command 
aws iam create-role --role-name vmimport --assume-role-policy-document file://trust-policy.json (Need to go the path where the trust-policy.json is saved)  


     2. Type the below commands in a notepad and name it as role-policy.json
{
   "Version": "2012-10-17",
   "Statement": [
      {
         "Effect": "Allow",
         "Action": [
            "s3:ListBucket",
            "s3:GetBucketLocation"
         ],
         "Resource": [
            "arn:aws:s3:::disk-image-file-bucket"
         ]
      },
      {
         "Effect": "Allow",
         "Action": [
            "s3:GetObject"
         ],
         "Resource": [
            "arn:aws:s3:::disk-image-file-bucket/*"
         ]
      },
      {
         "Effect": "Allow",
         "Action":[
            "ec2:ModifySnapshotAttribute",
            "ec2:CopySnapshot",
            "ec2:RegisterImage",
            "ec2:Describe*"
         ],
         "Resource": "*"
      }
   ]
}

    disk-image-file-bucket -> implies the bucket name 

    Now run the command 
    aws iam put-role-policy --role-name vmimport --policy-name vmimport --policy-document file://role-policy.json


     3. Finally importing the VM- Open a notepad and type the below commands and save this fie as containers.json file. 

[
  {
    "Description": "Windows 2008 OVA",
    "Format": "ova",
    "UserBucket": {
        "S3Bucket": "my-import-bucket",
        "S3Key": "vms/my-windows-2008-vm.ova"
    }
}]
         
         S3Bucket -> It indicates the bucket name
         S3Key -> It is the path of the ova file in S3 (Make this file public and copy that location). 
         
    aws ec2 import-image --description "Windows 2012 OVA" --disk-containers file://containers.json
       (This command imports the image in reference with containers.json file).

    
          The ova is imported and it is pending state. 

    Step 6: Check the Import task
     
    To check the status of the Import,
     aws ec2 describe-import-image-tasks --import-task-ids import-ami-ffrnccwy
     (we get the AMI id from import task id from the containers.json policy)
     After multiple checks, the status of the import shows "Completed"
     
    
      Finally, the AMI is created in AWS and now that we have an AMI, we can launch it as an instance or copy it to another region. 


      Step 7: Verifying the VM Imported as AMI.

      Launch an instance using the AMI (Image of the VM) which is created in our AWS EC2 environment. Connect to the instance using Remote desktop connection and give the password which we have set it during the installation of the VM in VMware workstation. 


     Hence, the VM is imported successfully with the migration of the applications 😊


Note: This process will help us to perform VM cold migration, if somebody want to perform physical server, then process would remain same apart from converting Physical to VM, In future post will convert how to convert physical machine to VM.

Hope this post will help you.